Northern Navbars ⛄️

As we cross the Tundra, the snow begins to melt, leaving behind vast expanses of dirt and vegetation. Soon, a strange sight crosses our eye. In the distance, there appears to be a snowman meandering slowly through the pine trees.
Upon seeing us, it turns and waves.
"Welcome, I'm here to guide you along your quest! Follow me, and I'll teach you what you need to know. As your navigator, it's only fitting that we discuss the importance of navbars!"
Stranger and stranger! Pulling out our laptop, we began to listen...
Navbar Notes 01
In the last two chapters, we learned how to navigate across the multiple pages of our dashboard. However, our current system is a little bit clunky. One possible way to fix this is by utilizing a nabvar...
Creating Navbar Layout
Adding a navbar to our dashboard allows for easier navigation, providing a
fixed, non-changing area of our app which can be used to access other pages.
In the previous chapter, we implemented a dropdown to navigate across pages.
A navbar is as simple as wrapping this dropdown element into a dbc.Navbar() component!
Let's start with a simple example using dbc.Navbarsimple():
navbar = dbc.NavbarSimple([
      dbc.NavItem(dbc.NavLink("General", href="/")),
      dbc.DropdownMenu(
          children=[
              dbc.DropdownMenuItem("More pages", header=True),
              dbc.DropdownMenuItem("Prescribers", href="/pre"),
              dbc.DropdownMenuItem("TigerGraph Cloud", href="https://tgcloud.io/"),
          ],
          nav=True,
          in_navbar=True,
          label="More",
      ),
  ],
  brand="Example Navbar",
  brand_href="/",
  color="info",
  dark=True,
)

app = JupyterDash(__name__, external_stylesheets=[dbc.themes.BOOTSTRAP], suppress_callback_exceptions=True)

app.layout = html.Div([
    dcc.Location(id='url', refresh=False),
    navbar,
    html.Center(html.H1("Wow, look at this amazing navbar!"))
])

app.run_server(mode='external')
Let's break it down!
- First, we add a
dbc.NavItem()which contains a link to the homepage. As a result, thehreftag is simply a/. - After this, we add our
dbc.DropdownMenu(), very similar todbc.Dropdown()from earlier. This dropdown contains a header, titled "More Pages". Next, it contains a link to our Prescribers page as well as a link to the TigerGraph Cloud Portal. These links are added viadbc.DropdownMenuItem(). - With the
brandattribute, we can title our navbar and change its home link. - Finally, we can modify the colors and styling of the navbar.
Although we haven't included the pages themselves in this example, clicking the menu items will update the url.
Let's try another example using navbars!
The snowman excitedly exclaimed,
"That dropdown you created for your Prescribers page... let's create a Navbar for that!"
Navbar Notes 02
Adding Navbar Elements
Let's add our dropdown to our navbar, and our navbar to our Prescriber Page.
dropdown = dbc.Row(dbc.Col(
                    dcc.Dropdown(
                      id="pres-dropdown",
                      placeholder="Enter a prescriber..." ,
                      options=getPresList(),
                      style={'width':'400px'}
                    ),
                   width=12, align="end"
                  ), style={"margin-left":"600px"})

navbar = dbc.Navbar(
    [
        html.A(
            # Use row and col to control vertical alignment of logo / brand
            dbc.Row(
                [
                    dbc.Col(dbc.NavbarBrand("Healthcare Dashboard - TigerGraph's Dash Class Example", className="ml-2")),
                ],
                align="center",
                no_gutters=True,
            ),
            href="/",
        ),
        dropdown,
    ],
    color="dark",
    dark=True,
)

def prescriberPage(pres):
  prescriberTitleCard, tableCard, barCard, networkCard = getPrescriberInfo(pres)

  page = html.Center(html.Div([
            navbar,
            prescriberTitleCard,

            dbc.Row([
              dbc.Col(tableCard),
              dbc.Col([
                      barCard,
                      networkCard
                      ],
                  )
                ],
                justify='center'
            ),
        ]))

  return page
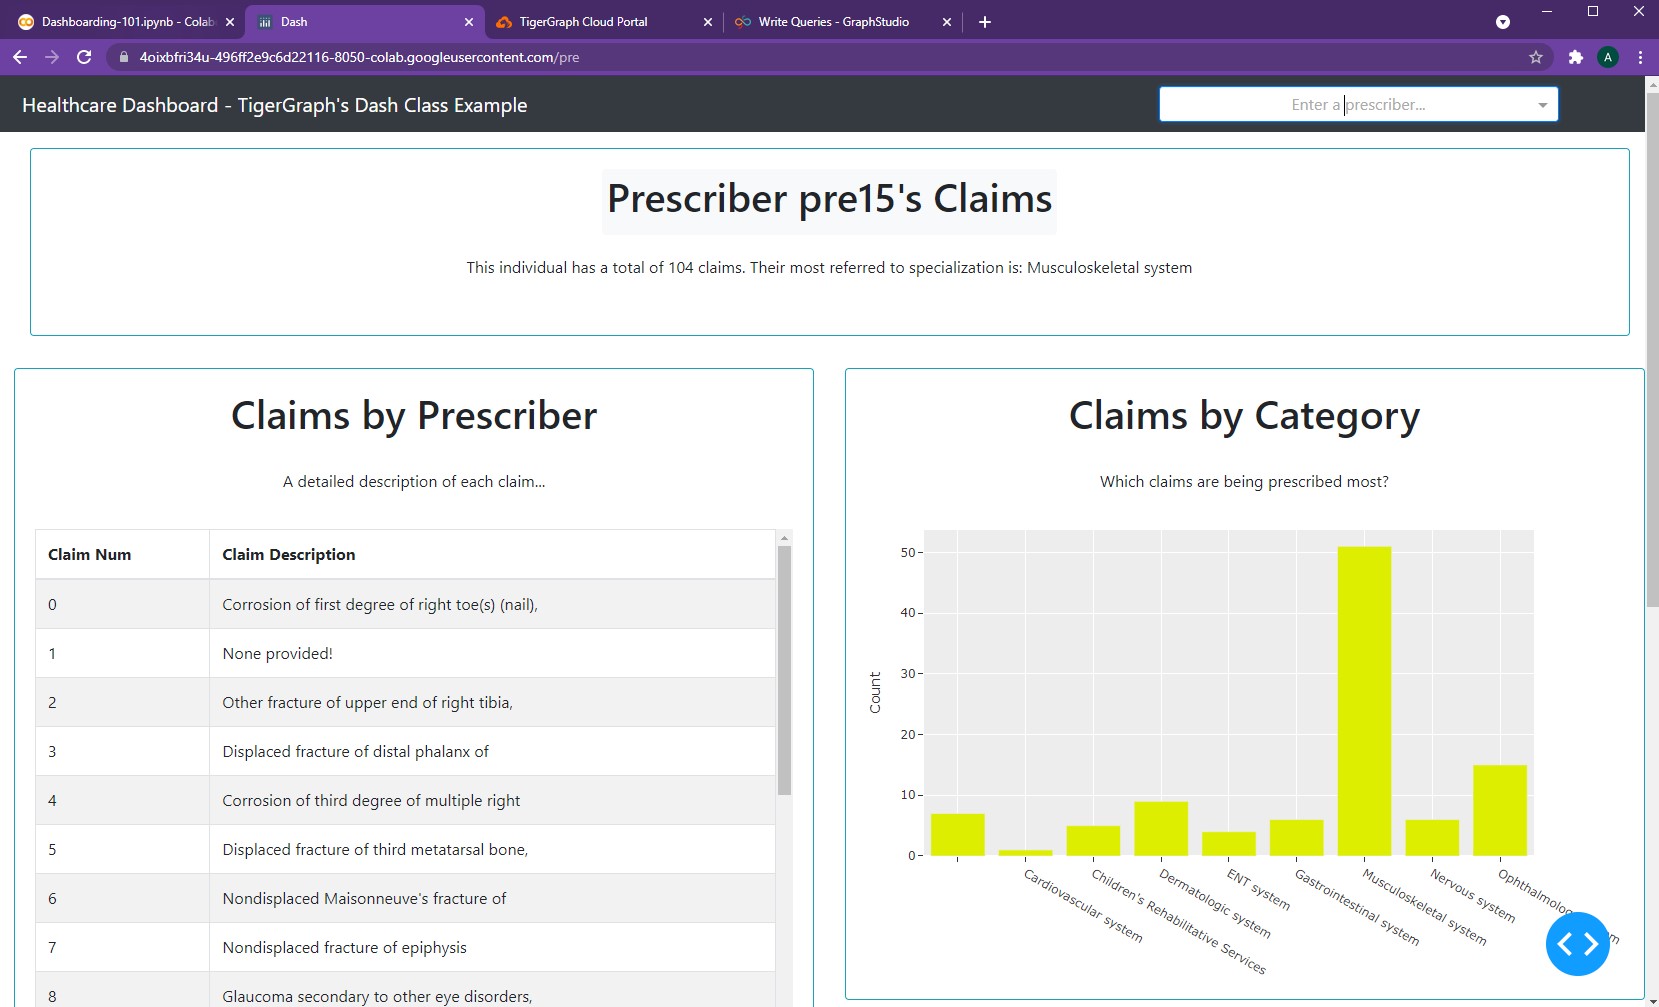
As seen, the navbar simply contains a hyperlinked header (that takes one back the main page) and a dropdown to enter prescriber information. No additional changes need to be made to the callback function. Here's the result!
That helps make the Prescriber Page look a lot better!
There's a few other options for Navbars as well, although we won't implement them for now:
- NavbarSimple - according to Dash, "simpler, but less flexible"
- Navbar - more customizability, but more intricate to set up
- NavbarBrand - contains a brand name (meant essentially for text)
- NavbarToggler - essentially a button (tracks clicks, times)
NOTE: For more information on navbars, feel free to check out the following resources:
dbc.Navbar()
As the snowman finishes explaining to us, the dirt under our feet begins to slowly turn into sand.
"This is it, the end of the Tundra and the beginning of the Desert. Continue through here, and you'll find the Elysium of Elements. Beyond that should lie your final destination, the last chapter. "
Before wandering away, the snowman reaches into his pocket and pulls out a sleeping gecko.
"This is Geronimo. Keep him in your pocket and he will help you."
As we cradle the gecko in our palms, he stirs and begins to slowly awaken.
-
All code segments from this chapter can be found in this Colab Notebook. Feel free to follow along! ↩
-
Everything we've installed so far (prerequistes for next section):
↩!pip install -q pyTigerGraph import pyTigerGraph as tg TG_SUBDOMAIN = 'healthcare-dash' TG_HOST = "https://" + TG_SUBDOMAIN + ".i.tgcloud.io" # GraphStudio Link TG_USERNAME = "tigergraph" # This should remain the same... TG_PASSWORD = "tigergraph" # Shh, it's our password! TG_GRAPHNAME = "MyGraph" # The name of the graph conn = tg.TigerGraphConnection(host=TG_HOST, graphname=TG_GRAPHNAME, username=TG_USERNAME, password=TG_PASSWORD, beta=True) conn.apiToken = conn.getToken(conn.createSecret()) !pip install -q jupyter-dash import dash import dash_html_components as html from jupyter_dash import JupyterDash import plotly.express as px import pandas as pd import plotly.graph_objects as go import dash_core_components as dcc !pip install dash-bootstrap-components import dash_bootstrap_components as dbc !pip install dash-cytoscape import dash_cytoscape as cyto