Confronted by Callbacks 🦕

The second monster grinned,
"Callbacks are essential to make one's dashboard dynamic! They allow the user to interact with one's page. Luckily for you travelers, I'm quite the expert when it comes to this area."
The first monster groaned and rolled his eyes,
"Yes yes, quite the professional. Can you just get on with it?"
The second monster laughed. Tracing words into the snow, he began to explain...
Callback Notes 01
A Simple Callback
Callbacks are functions that are called automatically by Dash everytime a component's property changes. They allow for dynamic pages. We had taken a look at a simple callback in the last chapter, but let's flesh it out further.
For reference, here's the code segment from before.
app = JupyterDash(__name__, external_stylesheets=[dbc.themes.BOOTSTRAP])

app.layout = html.Div([
    dcc.Location(id='url', refresh=False),
    html.Div(id='page-content')
])

@app.callback(dash.dependencies.Output('page-content', 'children'),
              [dash.dependencies.Input('url', 'pathname')])

def display_page(pathname):
  if pathname == "/":
    return generalPage
  elif pathname == "/pre":
    return prescriberPage

  return dbc.Jumbotron(
        [
            html.H1("404: Not found", className="text-danger"),
            html.Hr(),
            html.P("Uh oh! Unfortunately, the pathname {} was unable to be recognised...".format(pathname)),
        ]
    )

app.run_server(mode='external')
- As seen, our callback is introduced with the
@symbol - It can take a list of Output elements as well as a list of Input elements
- In our example, it takes in the input with the ID
'url'. This component isdcc.Location(id=url, refresh=False), which is a Dash element that simply keeps track of the url of the current page. - In our example, the output element is
html.Div(id='page-content'), which is just an empty placeholder. It's contents are currently empty, but replaced by the callback upon each url change
That wasn't too bad to explain! As seen above, callbacks consist of:
- Header - specified by
@app.callback(), followed immediately by a... - Function - can be titled anything, takes in the callback input as a parameter.
Let's take a look at a more complicated input!
Introducing dbc.Button()
Instead of just the url, what if we wanted to add more aesthetic functionality directly onto our dash page. One way to do this is with dbc.Button() element, which allows for cleaner clickability.
This bootstrap component is quite easy to set up.
generalPage = html.Center(html.Div([
                dbc.Col(dbc.Button(
                      "Switch Pages", id="switch-button",
                      className="mr-2", n_clicks=0, color="info", href="/pre"
                    ),
                    width=2
                ),
                dbc.Row(titleCard, justify="center"),
                dbc.Row(statsListGroup, justify="center"),
                html.Br(),

                dbc.Row([
                  pieChartCard,
                  scatterChartCard,
                  ],
                  justify="center"
                ),

              ]))

prescriberPage = html.Center(html.Div([
                  dbc.Col(dbc.Button(
                        "Switch Pages", id="switch-button",
                        className="mr-2", n_clicks=0, color="info", href="/"
                      ),
                      width=2
                  ),
                  prescriberTitleCard,

                  dbc.Row([
                    dbc.Col(tableCard),
                    dbc.Col([
                            barCard,
                            networkCard
                            ],
                        )
                      ],
                      justify='center'
                  ),
              ]))
And that's it. No callbacks needed, at least for now.
However, the button does have several other functionalities beyond serving as a glorified hyperlink. It can keep track of the number of clicks, serve as a method to download files, and be customized to change on click.
NOTE: For more information on Buttons, feel free to check out the following resources:
dbc.Button()
Introducing dcc.Input()
For more intricate input, we turn to dcc.Input().
This Dash Core Component supports several types of text entry, including:
- "text" - regular text, any character goes!
- "number" - numbers and hyphens (for negative) signs only
- "password" - each entered character will be shown as a black dot
- "email" - will ensure that entered text is a valid email format
- "tel" - will ensure that entered text is a valid telephone format
This element is quite powerful, and can easily be incorporated as shown in this example:
app = JupyterDash(__name__, external_stylesheets=[dbc.themes.BOOTSTRAP])

app.layout = html.Div([
    dcc.Input(
      id="example-input",
      type="number",
      placeholder="Please enter a number."
    ),
    html.H1("Your number squared is:"),
    html.Div(id='page-content')
])

@app.callback(dash.dependencies.Output('page-content', 'children'),
              [dash.dependencies.Input('example-input', 'value')])

def display_page(value):
  if value is None:
    return html.H3("N/A")
  return html.H3(value*value)


app.run_server(mode='external')
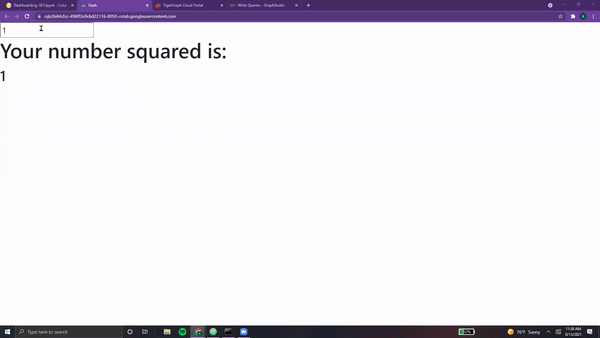
Taking a closer look, we see that the id of the dcc.Input() is used in our callback.
It's value attribute is passed in as the sole parameter of our callback function. Additionally,
the input type has been specified to be a number.
Additionally, it's good practice to ensure that regardless of the input, the callback returns some
acceptable value! Even if it's an empty html.Div() element, it's good practice to
make sure that there are no edge cases.
NOTE: Fore more information on input, feel free to check out the following resources:
dcc.Input
"Now, it's time to take these callbacks and apply them to your dashboard!"
Callback Notes 02
Currently, the Prescribers page is static, fixed with the value "pre-78". Let's change this so that users may able to search for any valid prescriber within the Graph. First, we need a list of all valid options...
Acceptible Prescribers (Query)
Using our knowledge from the TigerGraph Tundra, we can write a query that returns all Prescriber IDs.
AllPrescribers = '''USE GRAPH MyGraph
CREATE QUERY AllPrescribers() FOR GRAPH MyGraph {
  ListAccum<Vertex<Prescriber>> @@allPrescribers;

  start = {Prescriber.*};

  allPres = SELECT p
              FROM start:p
              ACCUM @@allPrescribers += p;

  PRINT @@allPrescribers as allPrescribers;
}
INSTALL QUERY AllPrescribers'''

print(conn.gsql(AllPrescribers, options=[]))
Running this query gives us the following output,

Now, we can package it into the appropriate format as follows.
def getPresList():
  pres = conn.runInstalledQuery("AllPrescribers")[0]['allPrescribers']
  return [{'label':x, 'value':x} for x in pres]
Awesome! The question remains, how do we incorporate this list into our search?
Although dcc.Input() can support this sort of wordbank in searches, for a simpler implementation
we will utilize its close relative, dcc.Dropdown(). Let's take a closer look...
Using dcc.Dropdown()
Dash's Dropdown allows users to select values from a given list of possible options.
This component is very powerful, allowing for multi-value selection, the ability to disable certain options, the ability to clear certain options, and the real-time updating of options based on the user's search terms.
For this example, we will be using a basic implementation.
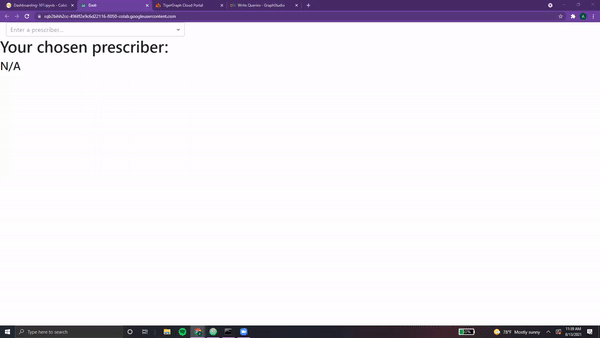
app = JupyterDash(__name__, external_stylesheets=[dbc.themes.BOOTSTRAP])

presList = getPresList()

app.layout = html.Div([
    dbc.Col(
        dcc.Dropdown(
          id="example-input",
          placeholder="Enter a prescriber..." ,
          options=presList
        ),
        width=3
    ),
    html.H1("Your chosen prescriber:"),
    html.Div(id='page-content')
])

@app.callback(dash.dependencies.Output('page-content', 'children'),
              [dash.dependencies.Input('example-input', 'value')])

def display_page(value):
  if value is None:
    return html.H3("N/A")
  return html.H3(value + " is valid!")


app.run_server(mode='external')
Breaking it down, we specify the id, placeholder text, and list of options for our Dropdown element. Then, within our callback, we simply display the chosen value as well as some accompanying text. Here's the result.
See, that wasn't so bad! Simple, yet quite powerful.
NOTE: For more information on Dropdown, feel free to check out the following resources:
dcc.Dropdown()
Putting it Together
Let's incorporate this search into our Prescribers Page.
dropdown = dbc.Col(
                    dcc.Dropdown(
                      id="pres-dropdown",
                      placeholder="Enter a prescriber..." ,
                      options=getPresList()
                    ),
                    width=3
                  )

def prescriberPage(pres):
  prescriberTitleCard, tableCard, barCard, networkCard = getPrescriberInfo(pres)

  page = html.Center(html.Div([
            dbc.Row([
                dropdown,
                dbc.Col(dbc.Button(
                      "Switch Pages", id="switch-button",
                      className="mr-2", n_clicks=0, color="info", href="/"
                    ),
                    width=2
                  ),
              ],
              justify='center'
            ),
            prescriberTitleCard,

            dbc.Row([
              dbc.Col(tableCard),
              dbc.Col([
                      barCard,
                      networkCard
                      ],
                  )
                ],
                justify='center'
            ),
        ]))

  return page
First, we create our dropdown component.
Next, we create a parameterized function that returns the prescriber page for a given prescriber.
Within this function, we incorporate the dropdown component (in the first dbc.Row()).
Now, we need to create our app and its callbacks.
app = JupyterDash(__name__, external_stylesheets=[dbc.themes.BOOTSTRAP], suppress_callback_exceptions=True)

presPage = html.Div(prescriberPage("pre78"), id='pres-content')

app.layout = html.Div([
    dcc.Location(id='url', refresh=False),
    html.Div(id='page-content')
])

@app.callback(dash.dependencies.Output('page-content', 'children'),
              [dash.dependencies.Input('url', 'pathname')])

def display_page(pathname):
  if pathname == "/":
    return generalPage
  elif pathname == "/pre":
    return presPage

  return dbc.Jumbotron(
        [
            html.H1("404: Not found", className="text-danger"),
            html.Hr(),
            html.P("Uh oh! Unfortunately, the pathname {} was unable to be recognised...".format(pathname)),
        ]
    )

@app.callback(dash.dependencies.Output('pres-content', 'children'),
              [dash.dependencies.Input('pres-dropdown', 'value')])

def update_pres(value):
  if value is not None:
    return prescriberPage(value)

  return prescriberPage("pre78") # Our default value


app.run_server(mode='external')
Several changes from before, so let's take a closer look!
-
First, we create a new variable to hold the contents of our prescriber page. Named
presPage, this element contains a unique id and is set to store the default prescriber page value using Prescriber #78. -
Next, we leave our
app.layout()and first callback untouched. These allow for navigation. -
In order to utilize the value of the dropdown, we write a new callback. This time, it's input is the
pres-dropdowncomponent. This callback function simply returns the Prescriber Page with the given prescriber. -
Note that we've had to add
suppress_callback_exceptions=Truein order to prevent warning pop-ups. This is because when we are on the general page, the dropdown element has not been loaded yet. Although this is not an issue, Dash registers this as a warning!
NOTE: Dashboards can have as many callbacks as desired. Although each callback can take unlimited inputs, each output can only be utilized once in a callback. For example, one cannot have two callbacks that both output
page-content. This will return an error when loading the Dash app. This is whydash.dependencies.Output()is simply one element, whiledash.dependencies.Input()is within a list.
And with that, we have the first verison of our dynamic dashboard!
The second monster grins,
"Yay! See, I told you I knew a lot about callbacks!
If you want to learn more, continue onwards past the Tundra. I've heard tales of a great Elysium of Elements in that direction. Maybe you can learn more about dashboards there?"
Beaming with pride, we wave goodbye and head off into the horizon.
-
All code segments from this chapter can be found in this Colab Notebook. Feel free to follow along! ↩
-
Everything we've installed so far (prerequistes for next section):
↩!pip install -q pyTigerGraph import pyTigerGraph as tg TG_SUBDOMAIN = 'healthcare-dash' TG_HOST = "https://" + TG_SUBDOMAIN + ".i.tgcloud.io" # GraphStudio Link TG_USERNAME = "tigergraph" # This should remain the same... TG_PASSWORD = "tigergraph" # Shh, it's our password! TG_GRAPHNAME = "MyGraph" # The name of the graph conn = tg.TigerGraphConnection(host=TG_HOST, graphname=TG_GRAPHNAME, username=TG_USERNAME, password=TG_PASSWORD, beta=True) conn.apiToken = conn.getToken(conn.createSecret()) !pip install -q jupyter-dash import dash import dash_html_components as html from jupyter_dash import JupyterDash import plotly.express as px import pandas as pd import plotly.graph_objects as go import dash_core_components as dcc !pip install dash-bootstrap-components import dash_bootstrap_components as dbc !pip install dash-cytoscape import dash_cytoscape as cyto