Supporting Simple GraphRAG: Part 1 - Graph Construction and Graph Store
Introduction
We have introduced how to integrate TigerGraph with LightRAG and Microsoft's GraphRAG. However, both solutions have some drawbacks.
First, regarding the integration with LightRAG: we found that querying takes some time because it calls Graph methods like get_node, get_node_edges, etc., for individual nodes in parallel rather than in batch, which is inefficient for graph operations. Another issue is its lack of flexibility—since all indexing and querying operations are predefined in LightRAG, customization is limited. For example, LightRAG uses a homogeneous graph, whereas heterogeneous graphs are widely used in real-world applications.
Second, regarding the integration with Microsoft's GraphRAG: we found its source code to be complex and difficult to customize. Additionally, it does not abstract the storage layer for the graph, meaning the output of the indexing process cannot be stored directly in TigerGraph. Instead, we need to convert Parquet files into a format that TigerGraph supports.
In this solution, we aim to create a simple, customizable approach inspired by the blog Build GraphRAG applications using Spanner Graph and LangChain. We will use the same dataset from the blog for demonstration purposes. However, when implementing LangChain's LLMGraphTransformer—which is responsible for generating graph nodes, edges, and properties—we encountered several issues. First, the schema is not expressive enough. While it allows specifying node types and edge types, it does not allow defining which node types an edge connects. Additionally, it does not allow specifying which properties belong to which nodes or edges. When reviewing the source code of the blog, we noticed extensive post-processing code to remove unwanted relationships, fix edge directions, etc. The second issue is performance—this solution takes three times longer to generate the graph topology compared to ours.
To address these limitations, we will call the LLM directly for better performance and data quality. TigerGraphX already integrates with OpenAI's chat and embedding functionality, so we will leverage these capabilities for generating the graph and embeddings during the indexing step, as well as for generating query embeddings and answers during the querying step.
To run this Jupyter Notebook, you can download the original .ipynb file from simple_graphrag_1.ipynb.
Raw Dataset
The raw dataset focuses on retail products. Here is an example of a document:
Product: SkyHawk Zephyr Drone
Price: $129.99
Weight: 220g (7.8 oz)
The SkyHawk Zephyr is the perfect drone for beginners. It's built for effortless flying, offering a smooth and enjoyable experience from the moment you unpack it.

Features:
- Simple Controls: Beginner friendly and intuitive controls, plus automatic takeoff and landing.
- Tough Build: Designed to handle rookie mistakes, thanks to its robust construction.
- Capture Memories: Record crisp HD photos and videos from above.
- Extended Fun: Enjoy up to 15 minutes of flight time per charge.
- Worry-Free Flying: Free Fly mode lets you fly without directional concerns.

Take your first flight with the SkyHawk Zephyr and discover the joy of aerial views!

Category: Drone
Segment: ['Home']
Tags: ['Photography', 'Videography']
As you can see, each document represents a product, with properties such as price, weight, etc., and relationships to its category, segment, tags, and more.
Create a Graph
Define the TigerGraph Connection Configuration
Since our data is stored in a TigerGraph instance—whether on-premise or in the cloud—we need to configure the connection settings. The recommended approach is to use environment variables, such as setting them with the export command in the shell. Here, to illustrate the demo, we configure them within Python using the os.environ method. You can find more methods for configuring connection settings in Graph.__init__.
>>> import os
>>> os.environ["TG_HOST"] = "http://127.0.0.1"
>>> os.environ["TG_USERNAME"] = "tigergraph"
>>> os.environ["TG_PASSWORD"] = "tigergraph"
Define a Graph Schema
TigerGraph is a schema-based database, which requires defining a schema to structure your graph. This schema specifies the graph name, nodes (vertices), edges (relationships), and their respective attributes.
We can define a graph schema based on the raw dataset, and the schema structure is visually represented in the following image.
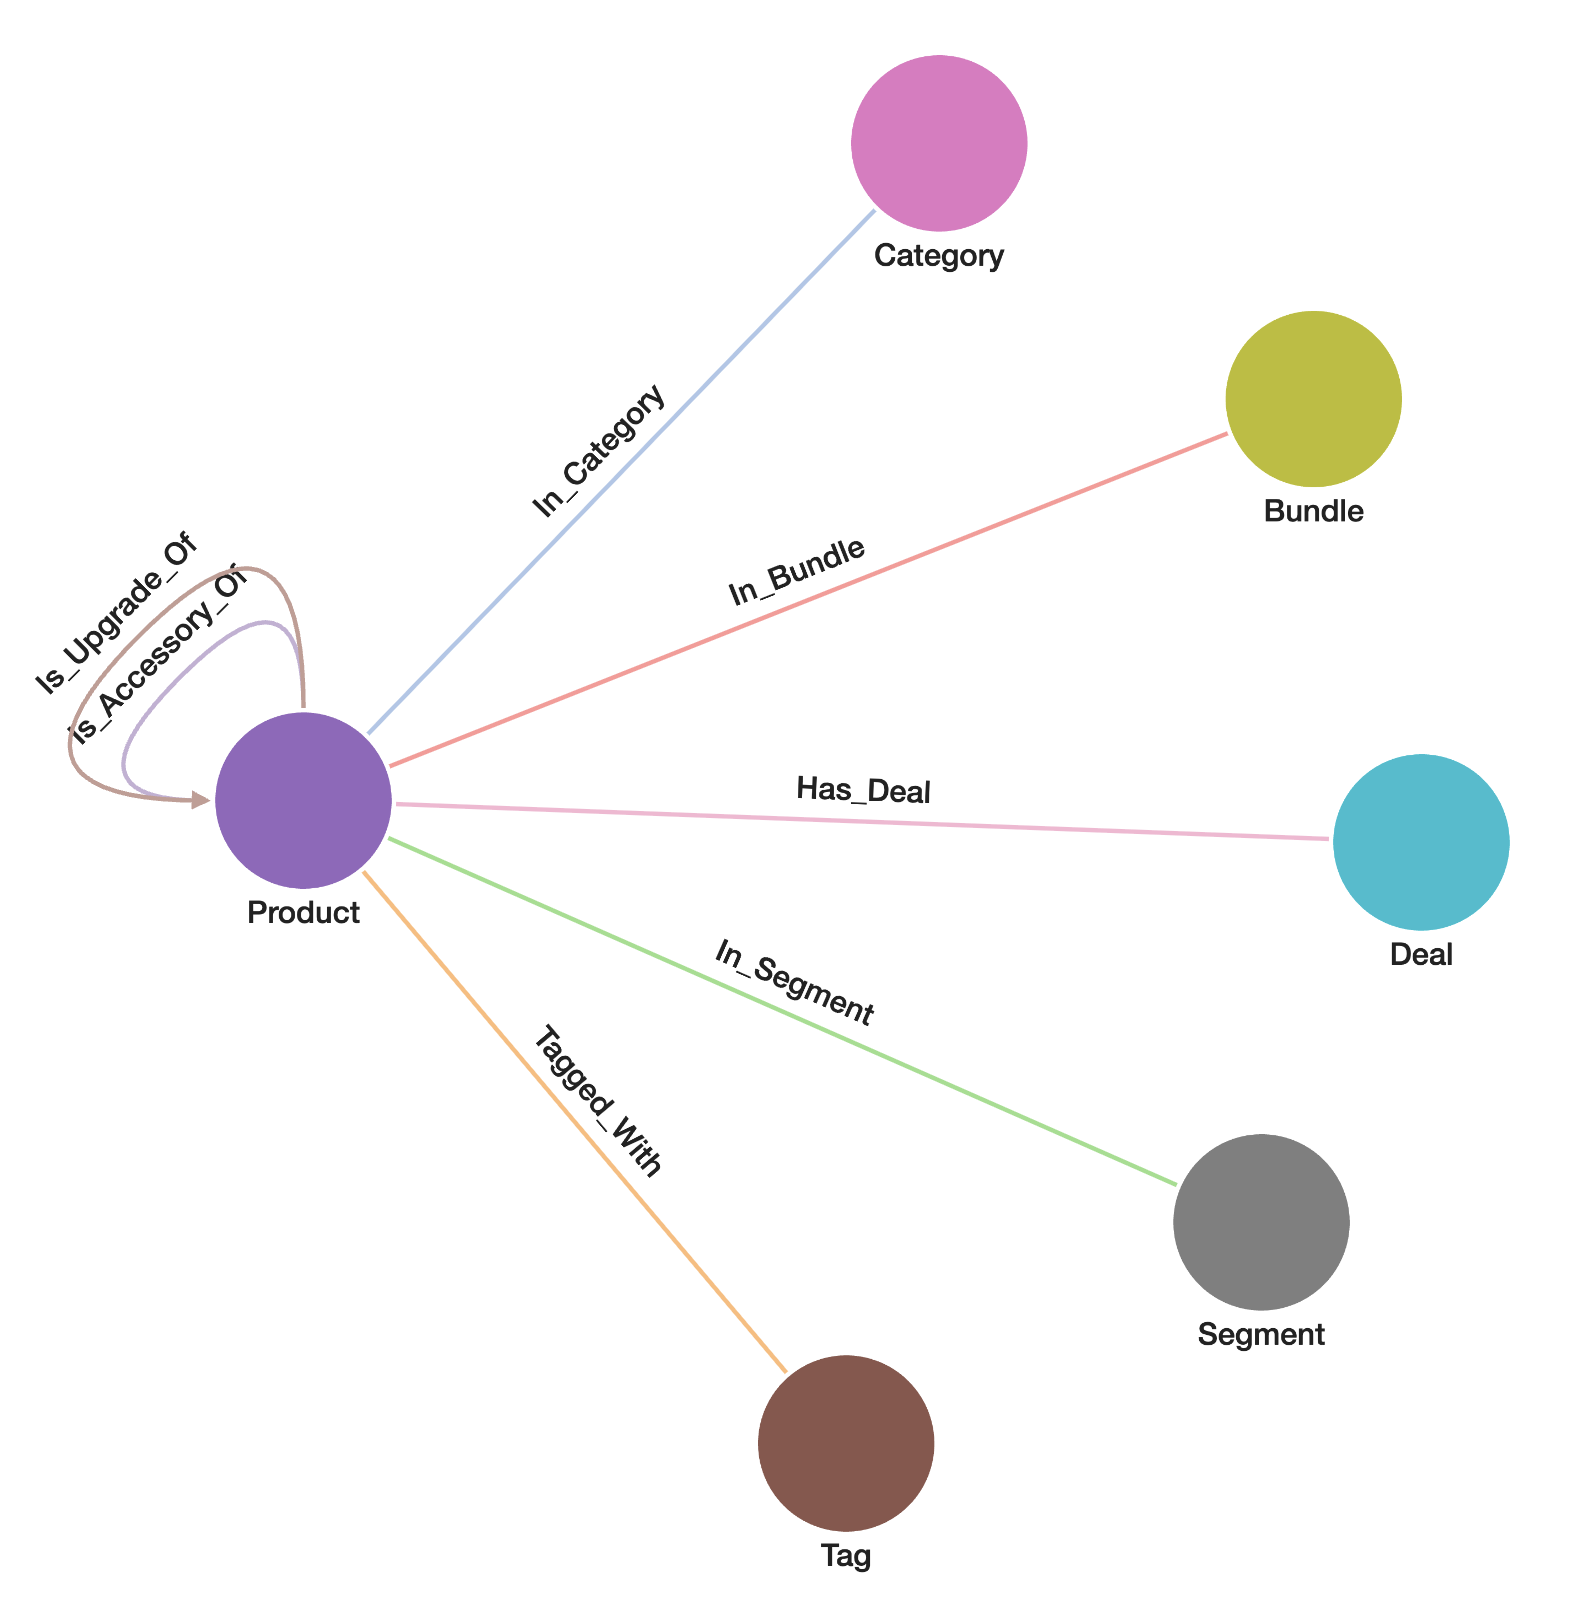 .
.
In this example, we will initialize a graph using the schema defined in the following Python dictionary, graph_schema.
>>> from tigergraphx import Graph
>>> graph_schema = {
...     "graph_name": "RetailGraph",
...     "nodes": {
...         "Product": {
...             "primary_key": "name",
...             "attributes": {
...                 "name": "STRING",
...                 "price": "DOUBLE",
...                 "weight": "DOUBLE",
...                 "features": "STRING",
...             },
...             "vector_attributes": {"emb_features": 1536},
...         },
...         "Tag": {
...             "primary_key": "name",
...             "attributes": {
...                 "name": "STRING",
...             },
...         },
...         "Category": {
...             "primary_key": "name",
...             "attributes": {
...                 "name": "STRING",
...             },
...         },
...         "Segment": {
...             "primary_key": "name",
...             "attributes": {
...                 "name": "STRING",
...             },
...         },
...         "Bundle": {
...             "primary_key": "name",
...             "attributes": {
...                 "name": "STRING",
...             },
...         },
...         "Deal": {
...             "primary_key": "name",
...             "attributes": {
...                 "name": "STRING",
...                 "deal_end_date": "DATETIME",
...             },
...         },
...     },
...     "edges": {
...         "In_Category": {
...             "is_directed_edge": False,
...             "from_node_type": "Product",
...             "to_node_type": "Category",
...         },
...         "Tagged_With": {
...             "is_directed_edge": False,
...             "from_node_type": "Product",
...             "to_node_type": "Tag",
...         },
...         "In_Segment": {
...             "is_directed_edge": False,
...             "from_node_type": "Product",
...             "to_node_type": "Segment",
...         },
...         "In_Bundle": {
...             "is_directed_edge": False,
...             "from_node_type": "Product",
...             "to_node_type": "Bundle",
...         },
...         "Is_Accessory_Of": {
...             "is_directed_edge": True,
...             "from_node_type": "Product",
...             "to_node_type": "Product",
...         },
...         "Is_Upgrade_Of": {
...             "is_directed_edge": True,
...             "from_node_type": "Product",
...             "to_node_type": "Product",
...         },
...         "Has_Deal": {
...             "is_directed_edge": False,
...             "from_node_type": "Product",
...             "to_node_type": "Deal",
...         },
...     },
... }
TigerGraphX offers several methods to define the schema, including a Python dictionary, YAML file, or JSON file. Above is an example using a Python dictionary. For other methods, please refer to Graph.__init__ for more details.
Create a Graph
Running the following command will create a graph using the user-defined schema if it does not already exist. If the graph exists, the command will return the existing graph. To overwrite the existing graph, set the drop_existing_graph parameter to True. Note that creating the graph may take several seconds.
>>> from tigergraphx import Graph
>>> G = Graph(graph_schema)
2025-03-28 12:58:41,809 - tigergraphx.core.managers.schema_manager - INFO - Creating schema for graph: RetailGraph...
2025-03-28 12:58:44,789 - tigergraphx.core.managers.schema_manager - INFO - Graph schema created successfully.
2025-03-28 12:58:44,790 - tigergraphx.core.managers.schema_manager - INFO - Adding vector attribute(s) for graph: RetailGraph...
2025-03-28 12:59:44,226 - tigergraphx.core.managers.schema_manager - INFO - Vector attribute(s) added successfully.
Construct the Graph and Generate the Embeddings
Load Documents
To construct the graph using LLM, we first need to load the raw dataset. The raw dataset has already been downloaded under the "../../applications/simple_graphrag/data/retaildata" directory, where all the documents are in ".txt" format. We define a method called load_documents to load all the documents from a specified path.
>>> import os
... def load_documents(path):
...     """Load text documents from subdirectories."""
...     documents = []
...     for root, _, files in os.walk(path):
...         for file in files:
...             if file.endswith(".txt"):  # Only process text files
...                 with open(os.path.join(root, file), "r", encoding="utf-8") as f:
...                     documents.append(f.read())
...     return documents

>>> document_lists = load_documents("../../applications/simple_graphrag/data/retaildata")
>>> print(len(document_lists))
68
Define the LLM Prompts
The key to enabling LLM to construct a high-quality graph is the prompt. The prompt consists of the following components:
- The graph schema we previously defined for the TigerGraph graph. It is crucial to ensure that LLM strictly adheres to this schema.
- Extraction rules, which are essential for improving data quality. During our tests, we added more rules to align the generated results with our expectations.
- Example document and expected output: This helps guide the LLM in generating the desired output.
- The document to be processed is also provided.
>>> def generate_prompt(document):
...     """Generate a structured prompt for OpenAI based on document content."""
...     return f"""
... You are an AI that extracts structured graph data from a given document, strictly following this schema:
...
... {str(graph_schema)}
...
... ### **Extraction Rules:**
... - Extract the exact `name` of each entity as it appears in the document. **Do not modify, expand, or infer names.**
... - The `Segment` can only be one of: `"Home"`, `"Office"`, or `"Fitness"`. If a `Segment` is not explicitly mentioned, **do not assign one**.
... - Every `Product` must have:
...   - A `features` property describing key characteristics.
...   - A `price` (as a numeric value, not a string).
...   - A `weight` (as a numeric value, not a string).
... - Do not infer missing information. Only extract what is explicitly stated in the document.
... - **Do not create relationships with `null` targets.** If a valid target is not available, omit the relationship from the output.
... - If a `Category` is not mentioned explicitly, **do not generate it**.
... - If a `Bundle` is not mentioned explicitly, **do not generate it**.
... - If a `Deal` is not mentioned explicitly, **do not generate it**.
... - Maintain consistent formatting for all properties.
... - **Do not add comments to the JSON output**.
... - If a field is missing or the value is unknown, set it as `""`.
...
... ---
...
... ### **Example Document & Expected Output:**
...
... #### **Document:**
... ```
... Product: SkyHawk Zephyr Drone
... Price: $129.99
... Weight: 220g (7.8 oz)
... The SkyHawk Zephyr is the perfect drone for beginners. It's built for effortless flying, offering a smooth and enjoyable experience from the moment you unpack it.
...
... Features:
... - Simple Controls: Beginner friendly and intuitive controls, plus automatic takeoff and landing.
... - Tough Build: Designed to handle rookie mistakes, thanks to its robust construction.
... - Capture Memories: Record crisp HD photos and videos from above.
... - Extended Fun: Enjoy up to 15 minutes of flight time per charge.
... - Worry-Free Flying: Free Fly mode lets you fly without directional concerns.
...
... Take your first flight with the SkyHawk Zephyr and discover the joy of aerial views!
...
... Category: Drone
... Segment: ['Home']
... Tags: ['Photography', 'Videography']
... ```
...
... #### **Expected Output (JSON format):**
... ```json
... {{
...   "nodes": [
...     {{"id": "SkyHawk Zephyr Drone", "type": "Product", "properties": {{"name": "SkyHawk Zephyr Drone", "price": 129.99, "weight": 220, "features": "Simple Controls: Beginner friendly and intuitive controls, plus automatic takeoff and landing. Tough Build: Designed to handle rookie mistakes, thanks to its robust construction. Capture Memories: Record crisp HD photos and videos from above. Extended Fun: Enjoy up to 15 minutes of flight time per charge. Worry-Free Flying: Free Fly mode lets you fly without directional concerns."}}}},
...     {{"id": "Drone", "type": "Category", "properties": {{"name": "Drone"}}}},
...     {{"id": "Photography", "type": "Tag", "properties": {{"name": "Photography"}}}},
...     {{"id": "Videography", "type": "Tag", "properties": {{"name": "Videography"}}}},
...     {{"id": "Home", "type": "Segment", "properties": {{"name": "Home"}}}}
...   ],
...   "relationships": [
...     {{"source": "SkyHawk Zephyr Drone", "target": "Drone", "type": "In_Category"}},
...     {{"source": "SkyHawk Zephyr Drone", "target": "Photography", "type": "Tagged_With"}},
...     {{"source": "SkyHawk Zephyr Drone", "target": "Videography", "type": "Tagged_With"}},
...     {{"source": "SkyHawk Zephyr Drone", "target": "Home", "type": "In_Segment"}}
...   ]
... }}
... ```
...
... ---
...
... ### **Now process the following document:**
... {document}
...
... **Follow the exact JSON structure as shown above.**
... """
Graph Construction and Embedding Generation
In this section, we define an asynchronous pipeline for processing documents with an LLM and structuring the extracted information into a graph format. The key components of this process are:
- Processing Individual Documents: Each document is processed using
process_document(), which sends a request to the LLM and retrieves a structured response based on the defined prompt. - Writing Graph Data to CSV: The
write_csv()function saves extracted nodes and relationships into separate CSV files, enabling efficient storage and retrieval. - Handling Multiple Documents:
process_all_documents()processes multiple documents in parallel, extracts structured graph data, and writes it to output files. - Generating Embeddings: If a node contains features, an embedding representation is generated using OpenAI's embedding model and stored as a node property.
>>> import asyncio
>>> import aiofiles
>>> import json

>>> from tigergraphx.llm import OpenAIManager, OpenAIChat
>>> from tigergraphx.vector_search import OpenAIEmbedding

>>> async def process_document(openai_chat, document):
...     """Process a single document asynchronously and return structured data."""
...     response = await openai_chat.chat(
...         [
...             {"role": "system", "content": "You are a helpful assistant."},
...             {"role": "user", "content": generate_prompt(document)},
...         ]
...     )
...     return response


>>> async def write_csv(filename, data_list, data_type):
...     """Write nodes or relationships to a CSV file asynchronously."""
...     async with aiofiles.open(filename, "w", newline="") as f:
...         if data_type == "node":
...             all_keys = sorted(
...                 {key for node in data_list for key in node["properties"].keys()}
...             )
...             await f.write(",".join(["id", "type"] + all_keys) + "\n")
...
...             for node in data_list:
...                 row = [node["id"], node["type"]] + [
...                     f'"{str(node["properties"].get(key, ""))}"'
...                     if "," in str(node["properties"].get(key, ""))
...                     else str(node["properties"].get(key, ""))
...                     for key in all_keys
...                 ]
...                 await f.write(",".join(row) + "\n")
...
...         elif data_type == "relationship":
...             await f.write("source,target\n")
...             for rel in data_list:
...                 await f.write(f"{rel['source']},{rel['target']}\n")


>>> async def process_all_documents(
...     openai_chat: OpenAIChat,
...     openai_embedding: OpenAIEmbedding,
...     document_lists,
...     output_dir,
... ):
...     """Process all documents asynchronously and write results to CSV."""
...     os.makedirs(output_dir, exist_ok=True)
...
...     tasks = [
...         asyncio.create_task(process_document(openai_chat, doc))
...         for doc in document_lists
...     ]
...     responses = await asyncio.gather(*tasks)
...
...     # Flatten responses and parse JSON
...     graph_documents = []
...     for response in responses:
...         cleaned_response = response.strip("`").replace(
...             "json\n", ""
...         )  # Remove backticks and json tag
...         try:
...             parsed_data = json.loads(cleaned_response)
...             graph_documents.append(parsed_data)
...         except json.JSONDecodeError:
...             print(f"Error parsing JSON: {cleaned_response}")  # Debugging
...             continue  # Skip invalid JSON
...
...     # Organize nodes and relationships
...     nodes, relationships = {}, {}
...
...     for doc in graph_documents:
...         for node in doc.get("nodes", []):
...             node_type = node["type"]
...             nodes.setdefault(node_type, []).append(node)
...
...         for rel in doc.get("relationships", []):
...             rel_type = rel["type"]
...             relationships.setdefault(rel_type, []).append(rel)
...
...     # Add embeddings to the graph documents for Product nodes
...     for node in nodes.get("Product", []):
...         if "features" in node.get("properties", {}):
...             embedding = await openai_embedding.generate_embedding(
...                 node["properties"]["features"]
...             )
...             node["properties"]["embedding"] = " ".join(map(str, embedding))
...
...     # Write CSV files
...     await asyncio.gather(
...         *[
...             asyncio.create_task(
...                 write_csv(
...                     os.path.join(output_dir, f"nodes_{node_type.lower()}.csv"),
...                     node_list,
...                     "node",
...                 )
...             )
...             for node_type, node_list in nodes.items()
...         ],
...         *[
...             asyncio.create_task(
...                 write_csv(
...                     os.path.join(output_dir, f"edges_{rel_type.lower()}.csv"),
...                     rel_list,
...                     "relationship",
...                 )
...             )
...             for rel_type, rel_list in relationships.items()
...         ],
...     )
After defining the functions, we configure the LLM and embedding models and execute the document processing pipeline. The steps include:
- Setting Up Logging: Minimizes unnecessary warnings from HTTP requests.
- Initializing OpenAI Components:
OpenAIManager,OpenAIChat, andOpenAIEmbeddingare initialized for LLM interaction and embedding generation. - Defining the Output Directory: Specifies the location for storing processed CSV files.
- Running the Processing Pipeline: Executes
process_all_documents()asynchronously to process and structure the dataset into a graph format.
>>> import logging
>>> logger = logging.getLogger("httpx")
>>> logger.setLevel(logging.WARNING)

>>> openai = OpenAIManager(config={})
>>> openai_chat = OpenAIChat(openai, config={"model": "gpt-4o-mini"})
>>> openai_embedding = OpenAIEmbedding(
...     openai, config={"model": "text-embedding-3-small"}
... )

>>> output_dir = "../../applications/simple_graphrag/data/output"

>>> print("Starting document processing...")
>>> await process_all_documents(openai_chat, openai_embedding, document_lists, output_dir)
>>> print("Document processing completed successfully!")
Starting document processing...
2025-03-28 12:59:56,462 - openai._base_client - INFO - Retrying request to /chat/completions in 0.388280 seconds
2025-03-28 12:59:56,473 - openai._base_client - INFO - Retrying request to /chat/completions in 0.444269 seconds
Document processing completed successfully!
Transfer CSV Files to TigerGraph Server
To transfer the generated CSV files to your TigerGraph server, you need to use the scp command. Before running the command, make sure to replace "d" with the correct server alias or hostname that you have configured in your ~/.ssh/config file. For example, if your ~/.ssh/config contains an entry like this:
# Docker
Host d
  Hostname localhost
  Port 14222
  User tigergraph
  IdentityFile ~/.ssh/tigergraph_rsa
You would replace "d" in the command with the alias d or the corresponding hostname you’ve set up. Here's the command you need to run:
>>> !scp ../../applications/simple_graphrag/data/output/*.csv d:/home/tigergraph/data/simple_graphrag
/opt/homebrew/Cellar/python@3.12/3.12.6/Frameworks/Python.framework/Versions/3.12/lib/python3.12/pty.py:95: DeprecationWarning: This process (pid=57331) is multi-threaded, use of forkpty() may lead to deadlocks in the child.
  pid, fd = os.forkpty()


edges_ tagged_with.csv                        100%   40    33.6KB/s   00:00
edges_in_bundle.csv                           100%  493   745.3KB/s   00:00
edges_in_category.csv                         100% 1374     2.0MB/s   00:00
edges_in_segment.csv                          100% 1891     3.4MB/s   00:00
edges_is_accessory_of.csv                     100%  478   885.8KB/s   00:00
edges_is_upgrade_of.csv                       100%   94   201.3KB/s   00:00
edges_tagged_with.csv                         100% 2746     3.6MB/s   00:00
nodes_bundle.csv                              100%  854     1.4MB/s   00:00
nodes_category.csv                            100% 1182     2.6MB/s   00:00
nodes_product.csv                             100% 2074KB 105.0MB/s   00:00
nodes_segment.csv                             100% 1265     3.1MB/s   00:00
nodes_tag.csv                                 100% 1791     4.1MB/s   00:00
Load Data
First, let's check the total number of nodes in the graph. As anticipated, the graph is currently empty.
>>> print(G.number_of_nodes())
0
After that, we will load data into the graph using a pre-defined loading job configuration. Note that loading the data may take several seconds.
>>> loading_job = {
...     "loading_job_name": "loading_job_retail",
...     "files": [
...         {
...             "file_alias": "f_nodes_product",
...             "file_path": "/home/tigergraph/data/simple_graphrag/nodes_product.csv",
...             "csv_parsing_options": {
...                 "separator": ",",
...                 "header": True,
...                 "EOL": "\\n",
...                 "quote": "DOUBLE",
...             },
...             "node_mappings": [
...                 {
...                     "target_name": "Product",
...                     "attribute_column_mappings": {
...                         "name": "name",
...                         "price": "price",
...                         "weight": "weight",
...                         "features": "features",
...                         "emb_features": 'SPLIT($"embedding", " ")',
...                     },
...                 }
...             ],
...         },
...         {
...             "file_alias": "f_nodes_tag",
...             "file_path": "/home/tigergraph/data/simple_graphrag/nodes_tag.csv",
...             "csv_parsing_options": {
...                 "separator": ",",
...                 "header": True,
...                 "EOL": "\\n",
...                 "quote": "DOUBLE",
...             },
...             "node_mappings": [
...                 {
...                     "target_name": "Tag",
...                     "attribute_column_mappings": {"name": "name"},
...                 }
...             ],
...         },
...         {
...             "file_alias": "f_nodes_category",
...             "file_path": "/home/tigergraph/data/simple_graphrag/nodes_category.csv",
...             "csv_parsing_options": {
...                 "separator": ",",
...                 "header": True,
...                 "EOL": "\\n",
...                 "quote": "DOUBLE",
...             },
...             "node_mappings": [
...                 {
...                     "target_name": "Category",
...                     "attribute_column_mappings": {"name": "name"},
...                 }
...             ],
...         },
...         {
...             "file_alias": "f_nodes_segment",
...             "file_path": "/home/tigergraph/data/simple_graphrag/nodes_segment.csv",
...             "csv_parsing_options": {
...                 "separator": ",",
...                 "header": True,
...                 "EOL": "\\n",
...                 "quote": "DOUBLE",
...             },
...             "node_mappings": [
...                 {
...                     "target_name": "Segment",
...                     "attribute_column_mappings": {"name": "name"},
...                 }
...             ],
...         },
...         {
...             "file_alias": "f_nodes_bundle",
...             "file_path": "/home/tigergraph/data/simple_graphrag/nodes_bundle.csv",
...             "csv_parsing_options": {
...                 "separator": ",",
...                 "header": True,
...                 "EOL": "\\n",
...                 "quote": "DOUBLE",
...             },
...             "node_mappings": [
...                 {
...                     "target_name": "Bundle",
...                     "attribute_column_mappings": {"name": "name"},
...                 }
...             ],
...         },
...         {
...             "file_alias": "f_edges_in_category",
...             "file_path": "/home/tigergraph/data/simple_graphrag/edges_in_category.csv",
...             "edge_mappings": [
...                 {
...                     "target_name": "In_Category",
...                     "source_node_column": "source",
...                     "target_node_column": "target",
...                 }
...             ],
...         },
...         {
...             "file_alias": "f_edges_tagged_with",
...             "file_path": "/home/tigergraph/data/simple_graphrag/edges_tagged_with.csv",
...             "edge_mappings": [
...                 {
...                     "target_name": "Tagged_With",
...                     "source_node_column": "source",
...                     "target_node_column": "target",
...                 }
...             ],
...         },
...         {
...             "file_alias": "f_edges_in_segment",
...             "file_path": "/home/tigergraph/data/simple_graphrag/edges_in_segment.csv",
...             "edge_mappings": [
...                 {
...                     "target_name": "In_Segment",
...                     "source_node_column": "source",
...                     "target_node_column": "target",
...                 }
...             ],
...         },
...         {
...             "file_alias": "f_edges_in_bundle",
...             "file_path": "/home/tigergraph/data/simple_graphrag/edges_in_bundle.csv",
...             "edge_mappings": [
...                 {
...                     "target_name": "In_Bundle",
...                     "source_node_column": "source",
...                     "target_node_column": "target",
...                 }
...             ],
...         },
...         {
...             "file_alias": "f_edges_is_accessory_of",
...             "file_path": "/home/tigergraph/data/simple_graphrag/edges_is_accessory_of.csv",
...             "edge_mappings": [
...                 {
...                     "target_name": "Is_Accessory_Of",
...                     "source_node_column": "source",
...                     "target_node_column": "target",
...                 }
...             ],
...         },
...         {
...             "file_alias": "f_edges_is_upgrade_of",
...             "file_path": "/home/tigergraph/data/simple_graphrag/edges_is_upgrade_of.csv",
...             "edge_mappings": [
...                 {
...                     "target_name": "Is_Upgrade_Of",
...                     "source_node_column": "source",
...                     "target_node_column": "target",
...                 }
...             ],
...         },
...     ],
... }
>>> G.load_data(loading_job)
2025-03-28 13:01:07,369 - tigergraphx.core.managers.data_manager - INFO - Initiating data load for job: loading_job_retail...
2025-03-28 13:01:14,751 - tigergraphx.core.managers.data_manager - INFO - Data load completed successfully.
Now, let's check the total number of nodes in the graph again. We should observe that some nodes have been successfully loaded into the graph.
>>> print(G.number_of_nodes())
102
Next Steps
- Supporting Simple GraphRAG: Part 2: Learn how to retrieve context and generate answers for user queries.
Start transforming your GraphRAG workflows with the power of TigerGraphX today!