Supporting Microsoft’s GraphRAG: Part 4 - Hybrid Retrieval and Integration with LLM
To run this Jupyter Notebook, you can download the original .ipynb file from msft_graphrag_4.ipynb.
Get the Graph from TigerGraph
Since the graph has already been created in TigerGraph, redefining its schema is unnecessary. Instead, you can provide the graph name to retrieve it. TigerGraphX will verify if the graph exists in TigerGraph and, if it does, will return the corresponding graph.
Define the TigerGraph Connection Configuration
Before retrive the graph schema from TigerGraph, you shoulddefine the TigerGraph Connection Configuration first.
The recommended approach is to use environment variables, such as setting them with the export command in the shell. Here, to illustrate the demo, we configure them within Python using the os.environ method. You can find more methods for configuring connection settings in Graph.__init__.
>>> import os
>>> os.environ["TG_HOST"] = "http://127.0.0.1"
>>> os.environ["TG_USERNAME"] = "tigergraph"
>>> os.environ["TG_PASSWORD"] = "tigergraph"
Retrieve the Graph
Once a graph has been created in TigerGraph, you can retrieve it without manually defining the schema using the Graph.from_db method, which requires only the graph name:
>>> from tigergraphx import Graph
>>> G = Graph.from_db("GraphRAG")
Hybrid Retrieval
TigerGraph offers two flexible ways to perform hybrid retrieval, allowing you to extract relevant graph and vector data efficiently for GraphRAG workflows.
Using TigerGraphX
TigerGraphX offers an intuitive, Python-native interface for hybrid retrieval, ideal for developers seeking simplicity and ease of use.
Key Advantage: Minimal learning curve with high-level Python APIs, seamlessly integrated with existing workflows.
Below are some illustrative examples.
Retrieve Nodes with Specific Attributes
You can use the following code to fetch up to two nodes of type "Entity" and display their "id," "entity_type," and "description" attributes.
>>> print(G.get_nodes(
...     node_type="Entity",
...     return_attributes=["id", "name", "entity_type", "description"],
...     limit=2,
... ))
                                 id           name entity_type  \
0  c0803923646246c5a203810faa4e4464  VALLEY STREAM         GEO
1  6069e8895f924b659534f74d6736e69d          CHINA         GEO

                                         description
0  Valley Stream is a location in New York where ...
1  China is a country in East Asia where Walmart ...
Retrieve Neighbors with Specific Attributes
The following code demonstrates how to fetch neighbors of specific nodes. In this example, the query retrieves neighbors connected to the given start_nodes of type "Entity" through the edge type "community_contains_entity". The attributes "id", "title", and "full_content" of the neighbors are returned.
>>> start_nodes = ["2268d4506af346a3a308a2145cd19734", "38515ccf6ce14852a0c0fabee67b7c42"]
>>> print(G.get_neighbors(
...     start_nodes=start_nodes,
...     start_node_type="Entity",
...     edge_types="community_contains_entity",
...     return_attributes=["id", "title", "full_content"],
... ))
   id         title                                       full_content
0   4   Community 4  # Bull Run Battles Community\n\nThe Bull Run B...
1  64  Community 64  # Walmart and Global Retail Expansion\n\nThe c...
2  31  Community 31  # Bull Run and the American Civil War\n\nThe c...
3  80  Community 80  # Bull Run and Its Historical Significance\n\n...
4  20  Community 20  # Walmart and Its Global Impact\n\nThe communi...
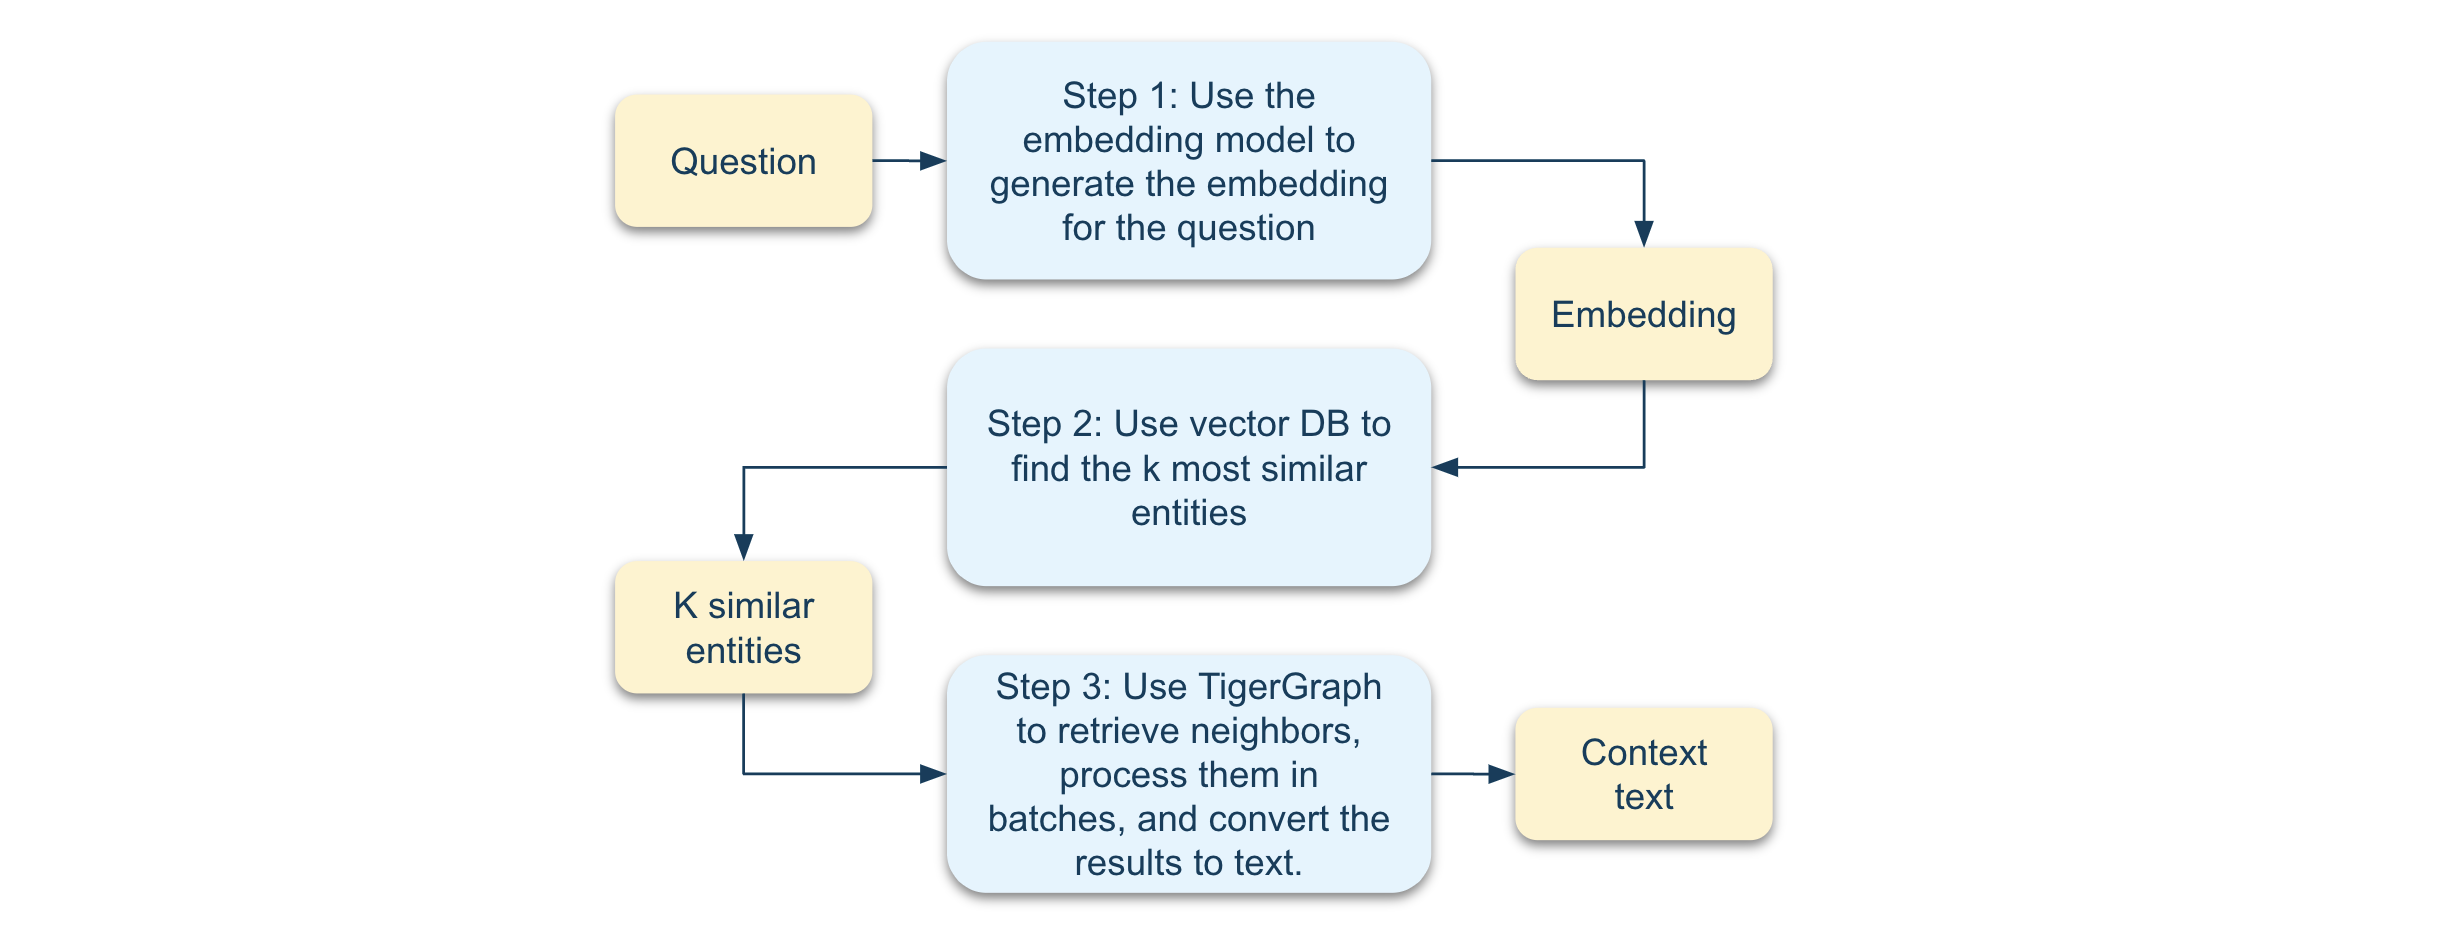
Retrieve Top-K Using TigerVector's Vector Search Capability
The following code generates a random query vector of 1536 float values and uses it to perform a vector search on a TigerGraph instance. The search finds the most similar "Entity" nodes based on the "emb_description" vector attribute and returns the top result.
>>> import random
>>> random_floats: list[float] = [random.random() for _ in range(1536)]
>>> results = G.search(
...     data=random_floats,
...     vector_attribute_name="emb_description",
...     node_type="Entity",
...     limit=1,
... )
>>> print(results)
[{'id': '98d96d2568b9413b8aafc4e982f676c0', 'distance': 0.9290141, 'human_readable_id': 511, 'name': 'WASHINGTON DULLES INTERNATIONAL AIRPORT', 'entity_type': 'GEO', 'description': 'Washington Dulles International Airport is a major airport serving the Washington, D.C. metropolitan area, facilitating both domestic and international travel.'}]
Using GSQL
For developers seeking fine-grained control or complex retrieval logic, GSQL offers unmatched flexibility. As TigerGraph's built-in query language, GSQL empowers you to perform advanced graph data analysis. For more details, see the official documentation.
Key Advantage: Supports complex logic, customization, and direct interaction with TigerGraph’s powerful query engine.
- Use an LLM to convert the query into an embedding.
- Write a GSQL query to retrieve the top-K similar objects and their neighbors, combining structured and vector-based retrieval:
CREATE OR REPLACE QUERY my_query (
    LIST<float> query_vector,
    int k
) SYNTAX v3 {
  Nodes = vectorSearch({Entity.emb_description}, query_vector, k);
  PRINT Nodes;

  Neighbors =
    SELECT t
    FROM (s:Nodes)-[e:community_contains_entity]->(t:Community);

  print Neighbors[Neighbors.id, Neighbors.title, Neighbors.full_content];
}
Context Building: Writing Custom Context Builders
Context builders play a vital role in graph-powered RAG workflows. They transform retrieved graph data into structured, meaningful contexts for tasks such as interactions with LLMs).
TigerGraphX simplifies this process by offering the flexible BaseContextBuilder class, which allows developers to define custom logic for context building.
Key Features of BaseContextBuilder
The BaseContextBuilder class in TigerGraphX provides a strong foundation for creating custom context builders, offering:
- Core Abstraction: A reusable framework for building context logic.
- Customizable Design: Extensibility for implementing both global and query-specific context generation.
Key Components
- Abstract Method -
build_context:
Subclasses must implement this method to define the logic for constructing context.
@abstractmethod
async def build_context(self, *args, **kwargs) -> str | List[str]:
    """Abstract method to build context."""
    pass
- Batching and Retrieval Methods:
batch_and_convert_to_text: Formats graph data into token-aware text.retrieve_top_k_objects: Efficiently retrieves top-K objects for query-based context.
Example: Global Context Builder
import tiktoken
from typing import Optional, List
from tigergraphx.graphrag import BaseContextBuilder
from tigergraphx.core import Graph
class GlobalContextBuilder(BaseContextBuilder):
    def __init__(
        self,
        graph: Graph,
        token_encoder: Optional[tiktoken.Encoding] = None,
    ):
        """Initialize LocalContextBuilder with graph config and token encoder."""
        super().__init__(
            graph=graph,
            single_batch=False,
            token_encoder=token_encoder,
        )
    async def build_context(self) -> str | List[str]:
        """Build local context."""
        context: List[str] = []
        config = {
            "max_tokens": 12000,
            "section_name": "Communities",
            "return_attributes": ["id", "rank", "title", "full_content"],
            "limit": 1000,
        }
        df = self.graph.get_nodes(
            node_type="Community",
            return_attributes=config["return_attributes"],
            limit=config["limit"],
        )
        if df is not None:
            text_context = self.batch_and_convert_to_text(
                graph_data=df,
                max_tokens=config["max_tokens"],
                single_batch=self.single_batch,
                section_name=config["section_name"],
            )
            context.extend(
                text_context if isinstance(text_context, list) else [text_context]
            )
        return context
2025-02-28 22:22:44,129 - datasets - INFO - PyTorch version 2.6.0 available.
Here’s how you can utilize the custom global context builder:
>>> global_context_builder = GlobalContextBuilder(G)
>>> context_list = await global_context_builder.build_context()
>>> # Print the first 1000 characters for easier visualization of long text
>>> print(context_list[0][:1000])
-----Communities-----
id|rank|title|full_content
77|7.5|Community 77|# PlayStation Network and Its Ecosystem\n\nThe community centers around the PlayStation Network, a vital online service for PlayStation consoles, and its associated entities, including various gaming consoles and key figures in Sony. The relationships among these entities highlight the interconnectedness of gaming hardware, online services, and leadership within Sony, which collectively shape the gaming experience for users.\n\n## PlayStation Network as a central hub\n\nThe PlayStation Network serves as the core online service for various PlayStation consoles, including the PS3, PS4, and PS5. This network enables online gaming, digital media access, and social interactions among users, making it a crucial component of the PlayStation ecosystem. Its establishment marked a significant shift in how users engage with gaming, allowing for multiplayer experiences and a wide array of digital content. The network's importance
Example: Local Context Builder
To understand the functionality of the LocalContextBuilder class, let's review the key code from its build_context method.
# Retrieve top-k objects
top_k_objects: List[str] = await self.retrieve_top_k_objects(query, k=k)
...
# Iterate over different neighbor types
for neighbor in neighbor_types:
    df = self.graph.get_neighbors(...)
    if df is not None:
        text_context = self.batch_and_convert_to_text(...)
        context.extend(
            text_context if isinstance(text_context, list) else [text_context]
        )
return "\n\n".join(context)
For full implementations of different context builders, refer to the following links:
Here’s how you can utilize the custom local context builder:
local_builder = LocalContextBuilder(graph=graph, search_engine=search_engine)
local_context = await local_builder.build_context(query="What are the main topics discussed in the article?")
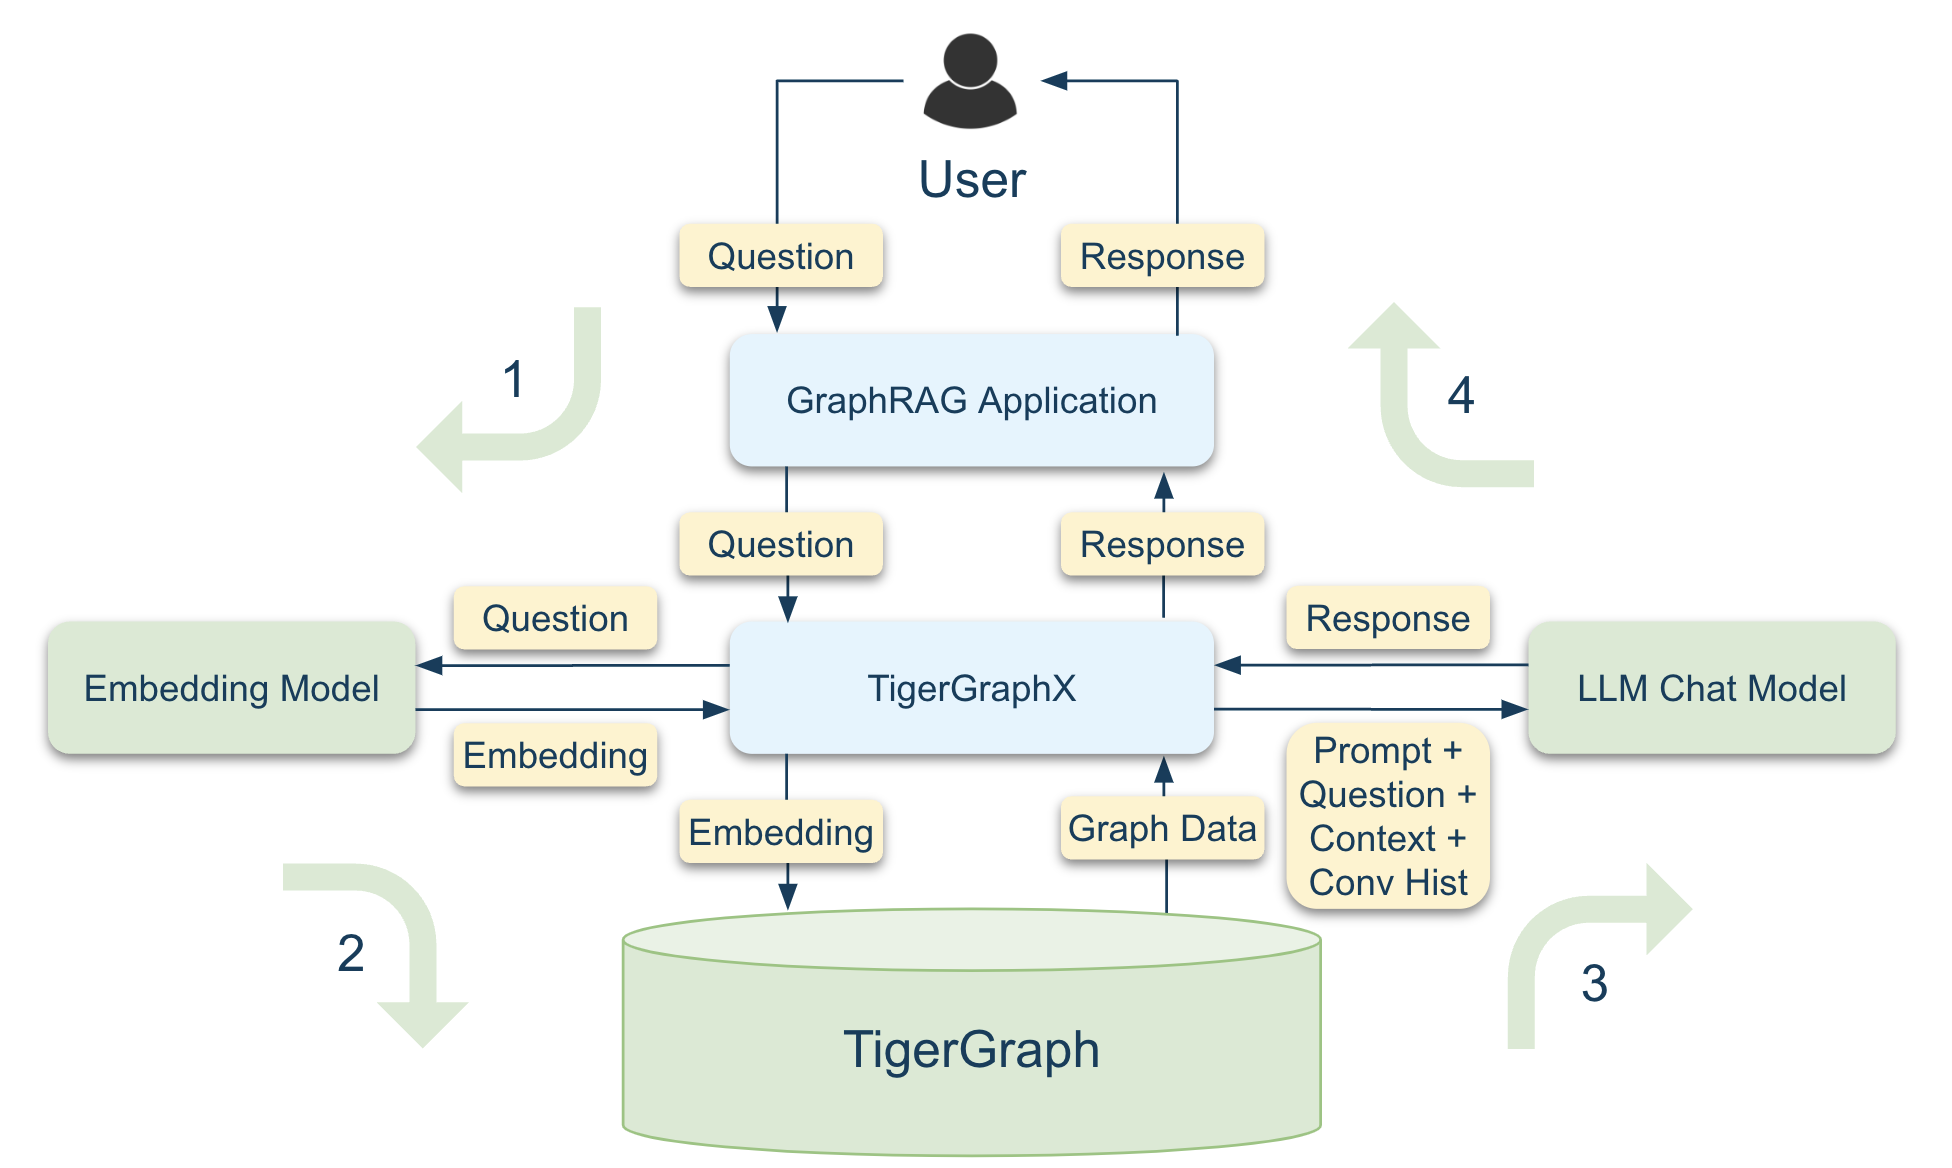
Integrate with LLM
After successfully building context from TigerGraph, the final step is integrating it with LLMs, including chat models and embedding models.
We have provided an example implementation, which you can find here: Example Code.
Workflow Overview
The integration process follows the workflow illustrated below:
What’s Next?
- Supporting Microsoft’s GraphRAG: Part 5: Query Microsoft’s GraphRAG and assess its performance.
Start transforming your GraphRAG workflows with the power of TigerGraphX today!