Supporting Microsoft’s GraphRAG: Part 2 - Graph Creation and Data Loading
In the previous section, we used Microsoft's GraphRAG to convert unstructured documents into Parquet files, and then used TigerGraphX to transform these files into CSV format.
Now, let’s use Jupyter Notebook to create the schema and load the CSV files into TigerGraph.
To run this Jupyter Notebook, you can download the original .ipynb file from msft_graphrag_2.ipynb.
Create a Graph
Define the TigerGraph Connection Configuration
Since our data is stored in a TigerGraph instance—whether on-premise or in the cloud—we need to configure the connection settings. The recommended approach is to use environment variables, such as setting them with the export command in the shell. Here, to illustrate the demo, we configure them within Python using the os.environ method. You can find more methods for configuring connection settings in Graph.__init__.
>>> import os
>>> os.environ["TG_HOST"] = "http://127.0.0.1"
>>> os.environ["TG_USERNAME"] = "tigergraph"
>>> os.environ["TG_PASSWORD"] = "tigergraph"
Define a Graph Schema
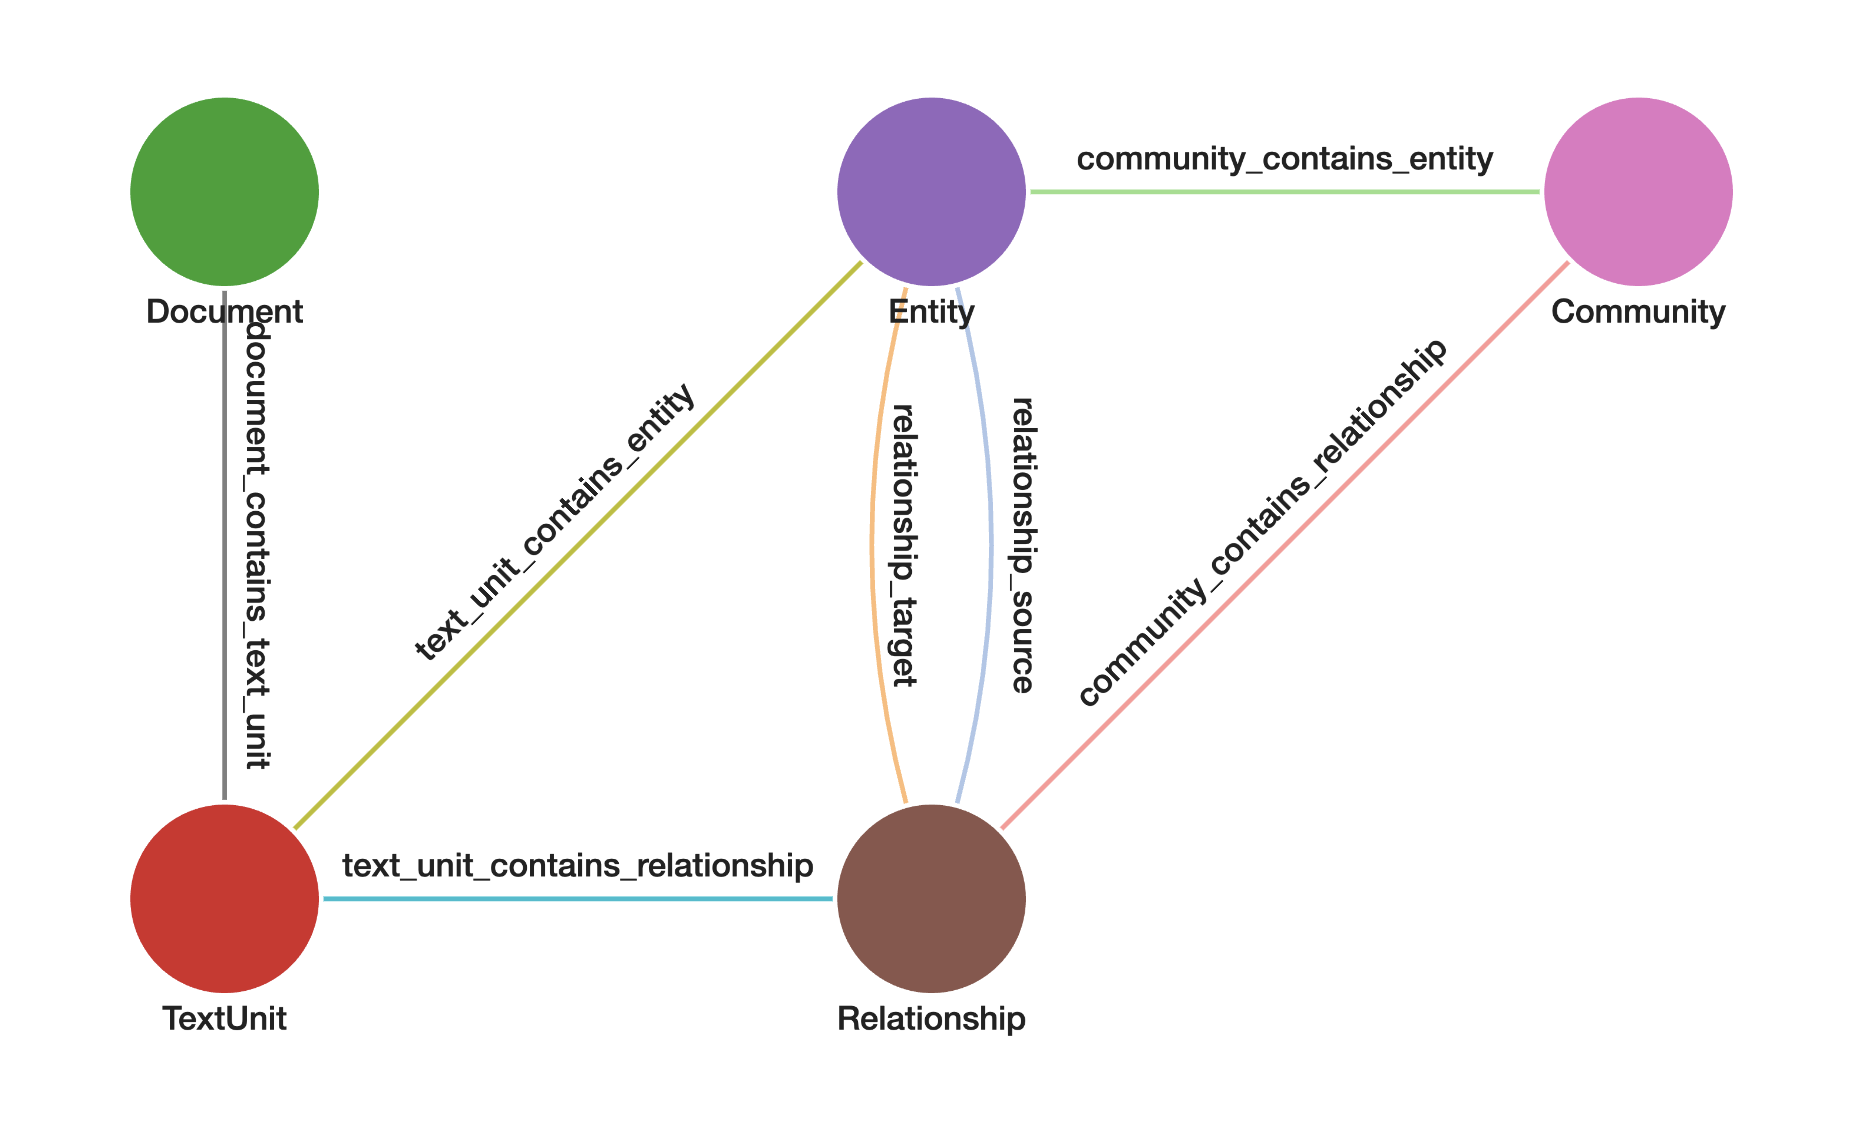
TigerGraph is a schema-based database, which requires defining a schema to structure your graph. This schema specifies the graph name, nodes (vertices), edges (relationships), and their respective attributes.
In this example, we will initialize a graph using a schema defined in a YAML file. The schema structure is represented visually in the following image.
>>> from tigergraphx import Graph
>>> resource_dir = "../../applications/msft_graphrag/query/resources/"
>>> graph_schema = resource_dir + "graph_schema.yaml"
TigerGraphX offers several methods to define the schema, including a Python dictionary, YAML file, or JSON file. Above is an example using a YAML file. For other methods, please refer to Graph.__init__ for more details.
Create a Graph
Running the following command will create a graph using the user-defined schema if it does not already exist. If the graph exists, the command will return the existing graph. To overwrite the existing graph, set the drop_existing_graph parameter to True. Note that creating the graph may take several seconds.
>>> from tigergraphx import Graph
>>> G = Graph(graph_schema)
2025-02-28 21:48:49,181 - tigergraphx.core.managers.schema_manager - INFO - Creating schema for graph: GraphRAG...
2025-02-28 21:48:52,805 - tigergraphx.core.managers.schema_manager - INFO - Graph schema created successfully.
2025-02-28 21:48:52,806 - tigergraphx.core.managers.schema_manager - INFO - Adding vector attribute(s) for graph: GraphRAG...
2025-02-28 21:49:58,529 - tigergraphx.core.managers.schema_manager - INFO - Vector attribute(s) added successfully.
Load Data
First, let's check the total number of nodes in the graph. As anticipated, the graph is currently empty.
print(G.number_of_nodes())
0
After that, we will load data into the graph using a pre-defined loading job configuration. The configuration is stored in a YAML file. Note that loading the data may take several seconds.
loading_job_config = resource_dir + "loading_job_config.yaml"
G.load_data(loading_job_config)
2025-02-28 21:52:18,639 - tigergraphx.core.managers.data_manager - INFO - Initiating data load for job: loading_job_GraphRAG...
2025-02-28 21:52:26,261 - tigergraphx.core.managers.data_manager - INFO - Data load completed successfully.
Now, let's check the total number of nodes in the graph again. We should observe that some nodes have been successfully loaded into the graph.
print(G.number_of_nodes())
2883
Next Steps
- Supporting Microsoft’s GraphRAG: Part 3: Use Jupyter Notebook to explore graph data and perform Graph Analysis.
Start transforming your GraphRAG workflows with the power of TigerGraphX today!